How to Print a Booklet in Google Docs – Step-by-Step Guide
This step-by-step guide will show you exactly how to arrange pages in Google Docs to create a professional-looking booklet. Whether you're working on a school project, a product brochure, or a creative portfolio – setting it up properly is easier than you think.
We print thousands of booklets every day for customers across a wide range of industries. Once your design is ready, you can order your booklet printing with us starting from just $0.37 – fast, affordable, and with premium quality.


Accessing Google Docs and Creating a Blank Document
To access Google Docs, you need to have a Google account. Here’s how you can sign in to Google Docs and create a new document.
- Open a web browser and navigate to Google Docs
- Sign in to your Google account. If you don’t have one, you can create a new account for free.
- Once signed in, you will see a page with templates and options for creating a new document.
- To create a new document, click the plus sign (+) icon or select Blank or new document from the Google Docs template gallery.

This article will describe how to create letterhead using a Word template or document and what professional-quality letterhead should look like.
Page Setup for Booklet Format
To create a clean, professional-looking booklet in Google Docs, it's important to set up your pages correctly from the start. This guide walks you through each step – from adjusting margins to arranging page order – to help you prepare your document for flawless printing.
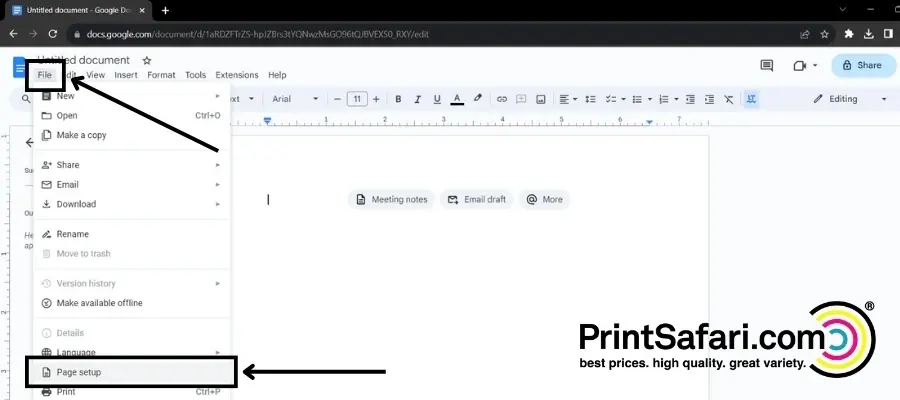
Go to the “File” menu and select “Page Setup” from the drop-down menu.
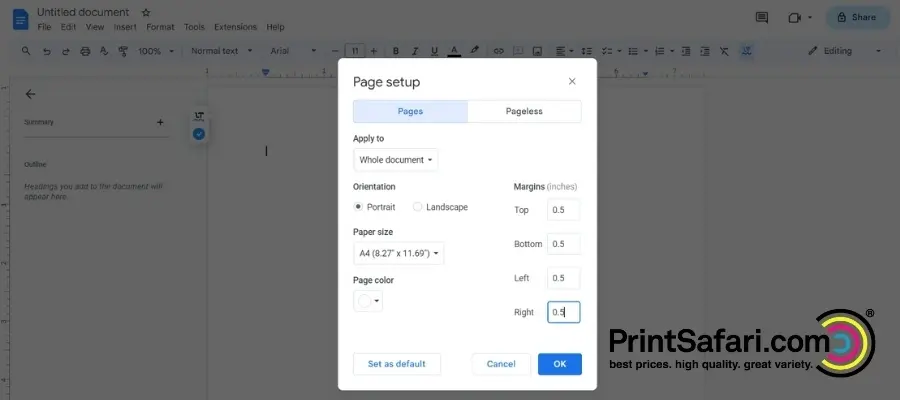
Paper size
Choose the paper size that matches your printer and your desired booklet template size. For example, if you want to print a booklet on A4 paper, choose A4 from the drop-down menu.
Margins
Set the margins to 0.5 inches or fewer on all sides. This will ensure that your content fits well on the page and leaves some space for binding.
Orientation
Select Landscape orientation from the drop-down menu. This layout lets you fit two pages on one sheet, which is crucial for creating a folded booklet format.
Click on the “OK” button to apply the page setup settings and close the dialog box.
Steps to Arrange Booklet Pages for Printing in Google Docs
Now that you have set up your page size, it’s time to arrange your booklet template pages in Google Docs. To print a booklet in Google Docs, you need to arrange your pages to form pairs of facing pages when folded.
For example, if you want to print a 16-page booklet in Google Docs, you need to arrange your page numbers as follows:
- Page 1: Cover page
- Page 2: Blank or back cover
- Page 3: Last page of content
- Page 4: Second page of content
- Page 5: Third page of content
- Page 6: Second last page of content
- Page 7: Fourth page of content
- Page 8: Blank or inside cover
- Page 9: Blank or inside cover
- Page 10: Fifth page of content
- Page 11: Third last page of content
- Page 12: Sixth page of content
- Page 13: Fourth last page of content
- Page 14: Seventh page of content
- Page 15: Blank or back cover
- Page 16: Cover page
Follow these steps to arrange your pages for printing.
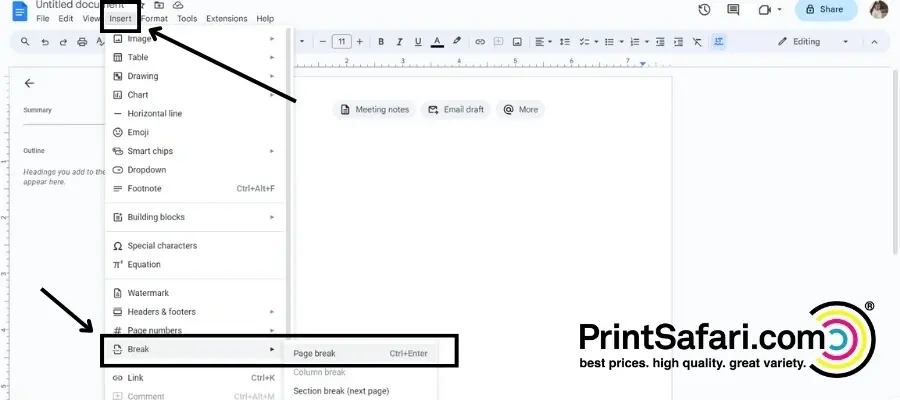
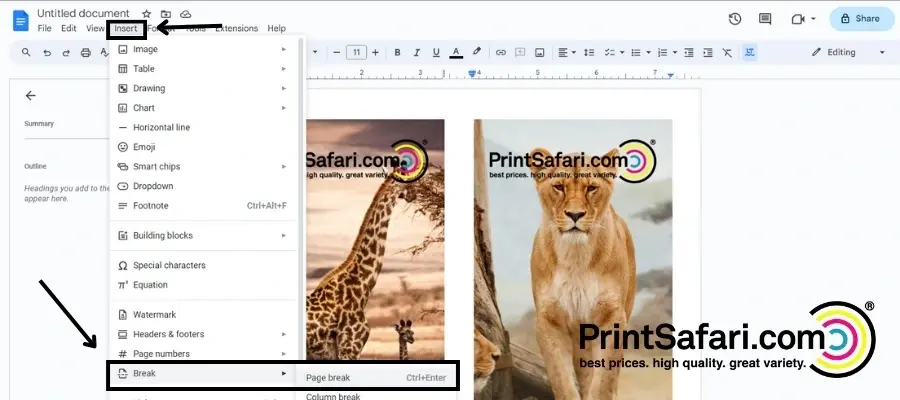
Page Break
In the Google Docs toolbar, click the “Insert” menu and select “Break” from the drop-down menu. Choose “Page break” to insert a page break after each page.
Columns
After inserting the page breaks, return to the toolbar and click on the “Format” menu. Select “Columns” from the drop-down menu and choose “Two” to create a two-column page layout for your booklet template.

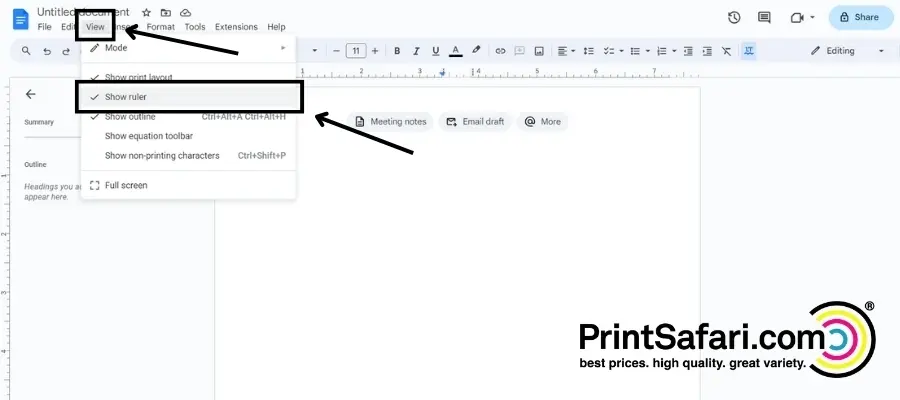
Enable Ruler
Now, you need to enable the ruler to ensure precise content alignment. To do this, click the “View” menu and select “Show ruler”.
Add and Adjust Images
Click on the image icon in the toolbar to add images to your booklet template. This will open a dialogue box where you can select and upload your desired images.
Once you add images, click on each image and use the scaling pop-up menu to adjust the size and position of the images within the booklet format pages.

Add and Customize Your Booklet Template Content
Use text boxes to add your content, such as text and headings, to the booklet in Google Docs. You can find the text box settings icon in the toolbar. Click on it and then click and drag on the page to create a text box. Customize the font size, corner size, and other formatting options as needed. To add pages to your booklet, go to Insert > Page > Insert Blank Page.
Printing Your Booklet
Once you have arranged your pages for the booklet in Google Docs, you can print your document using any printer that supports duplex printing (printing on both sides of the paper). To print your booklet, follow these steps:
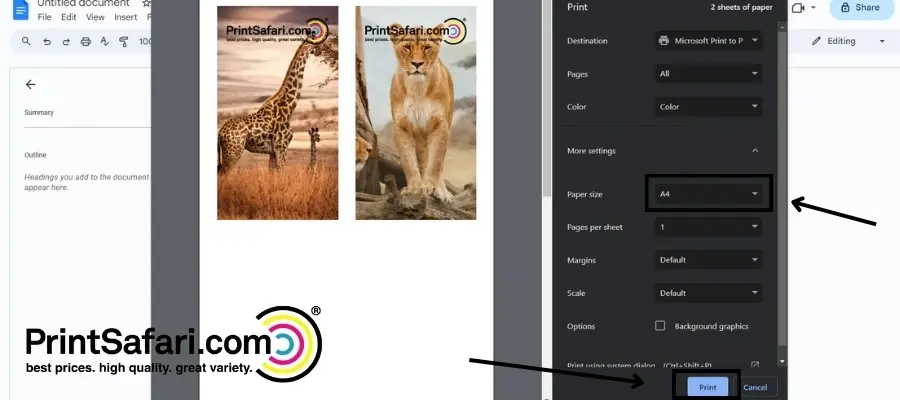
Go to the “File” and select “Print” from the drop-down menu. This will open the print settings dialog box.

In the print settings, ensure that the “Print range” area is set to “All” to print all the pages of your booklet.
Set the paper size to match the page size you used for your booklet in Google Docs.
Choose the desired printing options, such as the number of copies and the page range.
Select the appropriate print settings dialogue box settings if you want high-quality booklets. Moreover, download a PDF file of your booklet design to proofread.
Finally, click the “Print” button to start printing your booklet.
Tip: If you're planning to print more than a few copies, or want a professionally bound and trimmed result, it's best to use an online booklet printing service like us. This ensures perfect alignment, clean cuts, and a wide range of finishing options – including saddle stitch, wire-o, and perfect binding.
Layout Tips and Page Setup for Booklets in Google Docs
At PrintSafari, we specialize in high-quality booklet production – here’s what sets us apart:
1. Years of Experience in Professional Booklet Production
With years of hands-on experience, our team has helped countless customers create polished, print-ready booklets. This expertise allows us to deliver results that consistently meet the highest quality and design standards.
2. Cutting-Edge Printing Technology
Our investment in state-of-the-art printing technology is outstanding. We are committed to using the latest and greatest equipment, ensuring that your booklets are produced with precision, vibrant colors, and unmatched clarity, creating a lasting impression on your audience.
3. High-Quality Materials
We know that great materials make all the difference. Whether you’re aiming for a sleek, modern look or a more tactile, textured impression – our wide range of paper options helps bring your booklet to life. From smooth, durable finishes to luxurious premium stocks, we make sure your final product feels as good as it looks.
4. Wide Range of Customization Options
We offer a range of customization options to help bring your vision to life. From different sizes and formats to various binding options, we provide the flexibility to create a unique and personalized booklet that aligns with your branding and requirements.
5. Competitive Pricing and Fast Turnaround
Even with our commitment to premium quality, our pricing remains competitive – giving you excellent value without compromise. Thanks to our streamlined production and fast turnaround times, you’ll receive your finished booklets on schedule, even when working with tight deadlines.
6. Eco-Friendly Practices
We are very committed to environmental sustainability. Our printing processes prioritize eco-friendly practices, utilizing recycled materials and energy-efficient technologies to minimize our carbon footprint.
That’s why we at PrintSafari are a trusted partner for producing high-quality booklets – combining professional results with convenience and great value.
Print My Booklet